How to make (realistic) wings
In winter 2012 I found a way to create nice flywings. The fabric I used for the wings is packaging foam and is used for protecting stuff against damaging. It comes on big rolls named epe foam roll or sheet. The method is very simple, get an iron and heat the foam, it will shrink and a nice sheet is created from which you can make nice wings. Different layers can be used and laminated together. On the top layer of foam lay a sheet of baking paper to protect the iron getting damaged by the melting foam. Play around with the temperature of the iron, color the foam with markers and create the sheets you want. Another material to use this way is cling film, used to keep your food fresh. An article about cling film was published in Flyfishing and Flytying.  You can use it the same way as the foam and its also possible to combine it with foam. Laminate some layers of foam and cover it with a layer of cling film which makes a nice glossy surface on the foam. Stetch film, which is used for packing and sealing pallets is also suitable for this method and is some stiffer. All materials mentioned are polyethylene and can be mixed or used together when laminating.The cling film has a wonderfull shiny and glossy effect, you can also try folding 4 or 6 layers, place them between wingburners and burn the edges without laminating them together. When I use the iron to melt them together the glossy effect will disappear when using a high temperature. When you are going to use the iron, dont forget the baking paper on top of the foam to prevent the iron from melting plastic stuck to the bottom. When this will happen dont panic and take a sheet of printing paper and move the iron over the paper with some pressure and all the melted plastic will stick to the paper. I laminate using an iron and work on a smooth hard surface.
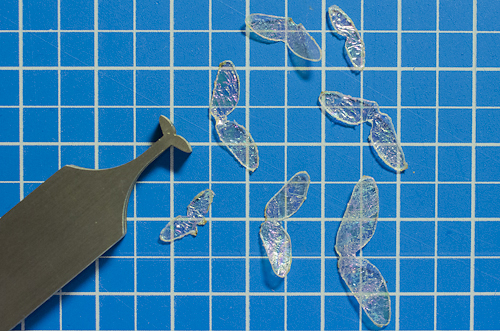
After lots of testing, I found a foil that’s used for decals and suitable to make wings. You can print it using an inkjet printer and its also available for a laserprinter. The thickness of the film is 0,05mm, most overheadsheets are much thicker and are also stiffer. The backside of the film has a sticky side, this has to be removed after printing using white spirit. After removing the sticky backside you wrap the cling film around both sides to cover the printed side to protect the print against wearing. Be sure no bubbles or ripples are on the cling film for a smoother result. You can add some color on the clingfilm for matching the hatch using a marker. Then laminate the sandwich with an iron (I use settings wool-silk on a piece of trespa).
I have tried these two films that are available at AC-Concept and prefer the one for inkjet printers:
10 Bl. A4 Inkjet PVC Klebefolie 2939 ( klar )
10 Bl. Outdoor Klebefolie 2999 (klar oder weiß)
The “outdoor klebefolie” is full waterproof, I would recommend that when you are able to use a laserprinter. The foil for inkjet printers is not full waterproof and needs some work to achieve that but the result is wonderfull and very flexible. The advantage of a laserprinter is that the image wont wash off the film so you dont have to cover the printed side. The problem is heat that can damage the film when printing. Use low settings to print with a laserprinter.
AC-Concept recommended:
Please take a “lower” setting like for example standard paper or copy paper. In that way the printer thinks he will get a very thin paper that must be transported very quickly. In that way the film will not get so much heat in the inside of the printer.
This works well but be carefull with the laserprinter!
The main advantage of using an inkjet printer is that you can easily make photorealistic prints. The print quality is lots better than the laserprints I have seen. 
Overhead sheets work also well but you need to get your hands on the thinnest ones. Every set of wingburners comes with a digital file which can be used for printing on these films. Pretty realistic wings can be made using this method. All shapes for the wingburners and prints for wings are made from photographs I took, so it will be pretty realistic.
Organza can be used and lots of wing materials provided by flyfishing stores can be used with wingburners. Another fabric that works well is poly yarn or the aero dry wing (Tiemco). Placed in a wingburner the fibers on the outside will melt and form a frame that is strong enough to make a nice wing. Featherwings can be made easlily by using fusable tape which is used to make and repair clothes like trousers. Cover both sides of a feather with fusable tape and wrap cling film around. One or two layers of cling film can be used. Laminate the sandwich and the tape will melt and act as a glue to bond the feather and the film. The feather is trapped in between the films and is very tough. For laminating I mostly use a pretty low temperature, settings silk or wool on the iron. Use a hot needle to melt difficult shapes around the wingburner when a cigarette lighter doesnt work well.
Wingburners
All wingburners available on the market have to be clamped by hand, the burners I make have to be unclamped using a small blade. This is an easier way to cut away material without the need to keep pressure on the tool. Both hands are free to turn the wingburner and cut away most material. The wingburners are made of stainless steel, 1,5mm thickness. Wingburners will be produced in small badges and are available while stocks lasts. All wingshapes and prints are based on my own photography work.

How to use them
Cut away the edges of film as much as possible and burn the edges with a lighter. Sometimes the flame doesn’t come deep enough into the narrow spaces of the wingburner like the middle part of the caddisfly or the wings for the damselfly.  Burn as far as it goes or use a needle or a cauter to get deeper. Oliver Edwards uses a cauterizing tool which is used for medical purposes. Google for “cauterizing tool” or “cauter”. The wingburner for the damselfly is an experimental wingburner and takes some practise but the result is great. I made this wingburner after looking at the Orvis film “Damsels in distress”. I use a soldering kit (Portalsol P-1K) for this wingburner which has a very fine powerfull point flame. When a normal sigarette lighter fails to burn between the narrow space between the wings, this one (or a hot needle or cauter) cracks the job. Take care for overheating the wingburner when you use a gas soldering torch like the P-1K. During the job take some time to cool down the wingburner to prevent it from overheating. The other wingburners in combination with a sigarette lighter will not have the overheating problem due to the material thickness of the wingburner.
  When you burn a wing, always remove the tag that’s left by the shaft of the wingburner. Remove this tag by using the two extra tools. Doing this you create a more stiff edge all around the wing and the laminated layers will be melted together thoroughly.
Final note
Best you can do to print your files: Have a look at a local reproshop or copyshop and ask if they are capable to print on decalfilms. At a reproshop I picked up 5 sheets (A3 size) of decal film printed with a high-end lasercopier. Costs €2,50 per sheet. For the amount of €12,50 I got 5 sheets (10 x A4) with beautifull prints, enough for many seasons flytying and fishing. Full waterproof and the same thickness (0,05mm) as I bought in Germany without the extra work of laminating. Easily bring your file to print to a copy shop and ask them to print the files on decal films.
PLA organic films
When I check my postbox sometimes flyers etc. will be sealed together in one package. On a few I found a green logo telling me that the film will be Bio-degradable.  PLA means Polylactic Acid and is derived from fermented plant starch such as corn or sugarcane. I collected some of these films and tried to laminate and use it for wings. The films work very well for some kinds of wings and I like to use it specially for very small wings. When normal PE films will melt and form some drops around the edges will PLA film more burn than melt and result in a very clean edge. Check the postbox and give it a try!
Waterslide decal
Waterslide decals are often used for scale model building and are very thin and vulnerable. You can use it for flies to show but for fishing flies I laminate the decal onto a tough film or between some layers of cling film. Cut out a piece you want to use and drop it in a bowl of water. Quickly the decal will come loose from the backing, dry with a cloth and laminate it using the iron.
Have a look on my video’s how it works.